Saturday, January 16, 2016

Shawarma-Like Chicken

Have you ever seen those towering posts of meat chunks all piled together, slowly roasting in their spices and juices at a Mediterranean eatery?

The other day I had a sample of "Shawarma Fries," and Shawarma rice bowls. I purposed to go home and fix up some kind of seasoned meat that would be similar.

Sometimes you get a little bored with all the seasonings you usually use. Not that you quit liking them, but you need something exciting once in awhile! This direction seemed fun. I looked in my cookbooks but didn't see anything right off, so I turned to my next source, the Internet. I found a good looking recipe on a food blog that I have used before. http://toriavey.com

The marinade was nicely interesting, and I had good hopes. A little nervous with the amount of cinnamon, but trust me, it works. You use a couple pounds of boneless skinless chicken, half thighs and half breasts, or all thighs if you want. I thought it was a humorous how she sort of begs you pretty-please DON'T use all breasts; they don't have enough fat in them to work right. I remember when the breasts used to be the premium cut of the chicken and cost a lot, but now it's the thighs!

I marinated overnight. Then you cut them into about 3 pieces and bake them for about 15 minutes on a baking sheet. She also gives the option of roasting over a BBQ for this step, but I saw no advantage.


After you bake them, they are sliced into shawarma-sized strips.

Then here is the interesting part. You sauté the slices in more olive oil until the smallest pieces are crispy. I went ahead and drained them in a colander.


I decided I wanted to make rice bowls, so I cooked up a skillet of rice. I like Basmati rice, so that's what I used. I took the leftover olive oil, seasoned and flavored with drippings, and used it to sauté the rice, a la Rice-a-Roni. Then I salted and watered it and cooked it.


I was really pleased with the results and consider it a "keeper."

I could print out the recipe, but really, you will enjoy making it from her pictures and descriptions much better than just my recipe words.

http://toriavey.com/toris-kitchen/2012/08/chicken-shawarma/

Thursday, October 15, 2015

Facebook cooking

Guest Post by Mel

You know those annoying too-easy-to-be-true, carefully designed to hit maximum brain craving recipes that pop up in Facebook? The ones that encourage you to "make sure you post this to your wall so that you can reference it later!!!!!!!!!!", as if there is one moron left in this world that hasn't figured out that doing so is actually sharing it with like all your gazillion friends who of course want to see the recipe as well as the million memes about *your* pet issue?

But I digress.

It finally happened. I finally had to put this idiocy to the test. Could I totally be missing out on some of the best kept secrets known to (wo)man of how to make succulent cravables in *my* kitchen? Could it be that instead of a shelf full of carefully vetted cookbooks, a binder full of my mother's recipes, and a handful of tried and proven cooking blogs, what I really needed was merely some pretty pictures and emoticons?

Project 1: It's apples...no it's onion rings....no it's...


Please go ahead and convince me that the product of this recipe isn't meant to evoke the promise of friend onion rings. But then you realize it's APPLES, and CINNAMON and SUGAR.....and well, I was sold.

Not so much when I saw the recipe.  That was an awful lot of of ingredients......


...And a lot of instructions.  That included graduating sizes of biscuit cutters to cut perfect little apple rings. 

Being not-a-food-blogger I don't *own* biscuit cutters and decided that cutting out the core in each apple slice and *not* wasting 75% of my apples just preserving a thin ring was the way to go. 

After making up the batter I belatedly realized it was just a glorified pancake batter, not some sort of fry coating. Ah well. I used plenty of oil in a deep cast iron skillet determined to get that fried coating look of the original picture....and ended up with this....


Fried pancake covered apple rings. That were tossed in a cinnamon sugar mixture.

I'll leave it up to you to make that "as advertised" with "reality" comparison side by side image.

I ate 2 or 3 and threw the rest of way.

Not impressed. Nothing special. Certainly not worth the effort. Lesson learned. For the next project...it needed to be simpler. Trendier. And for goodness sakes not include a list of ingredients and directions that took several screen shots to capture. Because obviously a real facebook recipe should be both cravable AND simple to make for someone with the attention span of......squirrel!

Project 2: I'm craving cinnamon rolls

This recipe was perfect. I found myself on a Saturday morning with a cinnamon roll craving and....a can of biscuits. A couple days prior I had scrolled through a facebook recipe that explained itself in pictures and seemed simple enough while delivering some sort of monkey bread-cinnamon roll experience  that promised to be heaven on earth. It skipped most of the pit falls of the previous recipe, making it clear that anyone with the ability to purchase ingredients and hold it together for 5 or 10 min could in fact make something so unforgettably delicious it would be a Saturday morning staple in my household for all time. As a bonus, it was simple enough I remembered both it AND how to make it DAYS after seeing it.

Getting into the spirit of things, I decided to try my own hand at a little food-blog-picture-taking.


Cut biscuits into pieces. Ignore the dirt on the counters.


Throw into oven safe skillet. Admire how well the black cast iron errr color coordinates with stuff like the black burners. Just like a real food blogger.  Promise yourself to wipe down the oven top....later. 


Heat up an approximate amount of butter. The "recipe" was rather vague on this but the pictures were very helpful and showed 2 sticks. But also a far more vast quantity of biscuits then I possessed. So I compromised on part of a stick. Which was then melted boiled in the microwave until the inside of said microwave was thoroughly buttered. As one does occasionally. 


I dumped in the rest of my cinnamon and sugar mixture I had sitting in the cupboard and declared it good enough and poured it over the top of the little doughy tidbits. 

Now I was a bit concerned since the recipe had shown biscuit chunks positively floating in a primordial soup of butter, cinnamon and sugar while some black color coordinated implement enticed them to swim underneath the surface. 

Mine were merely tossed and dripping like little sun tanners on the beach. But, I swallowed hard and decided that a butter/sugar crack mixture that came half way up the side of the skillet was almost as good. 


I placed in the oven, once again admiring how well my kitchen color coordinated!  

 Tada!!!!!!  Now for the critical part - flipping the monstrosity over. It was made very clear in the recipe, having made it in a bundt pan, that flipping it was critical to quality control.


Voila!  I scraped the rest of the cinnamon sugar tasties out of the bottom of the skillet and dribbled on top. This was looking promising!!!!!

Verdict? ummm....well. It was really buttery. Too buttery to be cinnamon roll. Sorta....meh. So much promise...but on delivery fell short. The biscuit dough was just a carrier which is fine, except there was too much of it not to help deliver with taste. The amount of butter was overwhelming and I was suddenly glad I hadn't sacrificed the entirety of my butter inventory to replicate the primordial soup. Maybe a garlic bread version would have been better. Maybe with copious amounts (more) of cinnamon and sugar it would have been outstanding (what isn't improved with more cinnamon and sugar?). But maybe...next time I'll just whip up my mother's biscuit no rise cinnamon rolls and have cinnamon rolls. Or buy the can of cinnamon rolls that is sold right next to the biscuits.

Project 3: The one that really did work

I found this not on facebook, but on a google search, armed with a gallon sized bag of raw almonds and the faint recollection that someone once told me almond milk was easy to make. And they were right.

It's easy, delicious, explains itself in pictures, and doesn't require exact measurements.

Make sure you post this on your timeline so you can easily reference it later!!!!!!! ;)


Soak raw almonds in water, enough to cover the almonds, for 1-2 days. Drain. (remind yourself to wipe down your counters...)


Put in blender with twice as much fresh water. The almonds plump during soaking and I use the dry volume of almonds to determine how much water to add. Shown is 1c. almonds (pre soaking) and adding 2 c. water.


Blend to smithereens.


And then blend some more.


Finished unstrained product. 


Lay a cheesecloth across a bowl. Or if you are me and don't own cheese cloth, use a damp (*cleanish....cleaner then my counters I swear!) kitchen towel. 


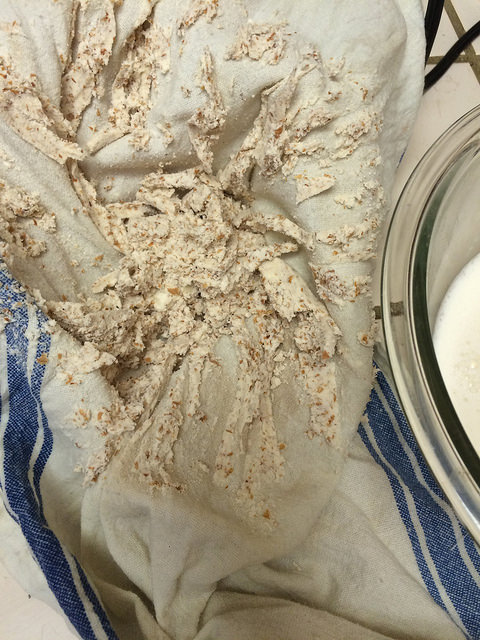
Squeeze the beejeezus out of it. 


Save or discard the almond fines (can be stored in fridge and used within 2 days, or can be spread and dried on a cookie sheet and used in flour type applications). 


Refrigerate the almond milk and use within 2 days. 

And this recipe is as good as it looks folks, I pinky swear promise. 

***Yes the towel was clean. What do you take me for? An uncivilized heathen who thinks black is the new kitchen coordinating color? ;)


Wednesday, August 5, 2015

The Best Soup I Ever Made

(And Maybe the Best Soup I Ever Ate)


I like tomatoes. And I like vegetable soup. I've made it a number of times. Once in awhile, I choose it a the soup and salad bar, though I'm sometimes doubtful whether I'll like it or not. It often seems a little greasy, or overcooked. Last Saturday I ended up with a bounty of ripe, fresh vegetables and greens from the farmers market and knew I couldn't eat them before they spoiled using my usual vegetable cooking methods, so I decided to make them into soup.

I had three sacks of dead-ripe tomatoes that I used for the base. Even though it was more work, I went ahead and skinned them by parboiling and slipping the skins. They were very small, so it was a LOT of extra work! I cooked down the tomatoes for about a half hour or so.

The order of events for adding the veggies was pretty important, since I wanted them all to have some texture still at the end of the cooking. So while the soup was making, I would periodically toss in the next sliced or chopped vegetable. While the tomatoes were simmering, I set some diced shallots to sautéing in a bit of olive oil.

Carrots first.

Add a chopped bell pepper to the sautéing onions.

Cut up the green and yellow beans and dump in.

Slice off corn from the cob and add.

Add big chunks of yellow squash.

Mince a couple garlic cloves and add to the sauté pan for the last couple minutes.

Set some gnocchi to boil in a separate pot.

Dump in contents of the sautéed pan.

Big handful of cut-up Swiss chard next.

Start seasoning the soup with red wine vinegar and "Better than Bouillion" chicken soup base mix (which I like to use instead of salt).

Dip out the cooked gnocchi and put in the soup.

Stir in chopped fresh basil and then turn off the burner.

I couldn't believe how sweet, rich, savory and flavorful it was! A nice addition would be a squirt if Sriarcha rooster sauce if you like the heat. Otherwise, it's perfect as-is.

Monday, July 13, 2015

I Welcome You, Sous-Vide

Sous-Vide, literally, "under vacuum." But that doesn't really describe what is going on with this method of cooking. You'd need words like "water, long time, airless, exact temperature, plastic bag, and convenient." So I'm sure you are just as puzzled as I was was when my friend Ken tried to describe the process to me. All I could think of was, That Steak is Ruined!

But it wasn't.

It was juicy. It was tender. It was perfectly medium rare. All four of them were exactly perfectly tender and medium rare. With pretty little grill marks across the tops and bottoms.

Here's the process. You take your pieces of meat and season them. You can either vacuum seal them up or arrange them in a freezer ziplock bag (or other high quality leakproof bag). Submerge them in a pot of water that is the temperature you want the interior of your finished product to be, and then leave them alone for an hour or more, up to, say, four hours. If you are using a ziplock, leave the top open and let the water squish the bag around the meat pieces until the air is out and then seal the bag. Oh, and the water needs to pretty much stay at that temp the whole time, however you want to manage that.

Here's how that worked with my dinner tonight.

Around 4pm I took out the two thick-cut New York strip steaks I had bought earlier today. They looked well-enough marbled, though I really didn't know how tender they were. Supposedly, this method lends more tenderness as the long slow heat softens the tougher fibers. Each steak was about .82 pounds, and I cut each in half.


I seasoned them with black pepper, garlic powder, and kosher salt.


I had enough left on my roll of sealing bags to use for this batch of steaks, so I used it. Each steak was arranged to have as much contact with the hot water as possible.


I vacuumed out the air and then sealed it shut.


Next was to submerge it in the pot of water. What was a little humerous to me is how much it reminded me of the mashing process of making beer. In fact, when I went online to study it some more, one of the comments was from someone else who recognized that, and he just tossed his bag 'o meat into the mash, then finished it off on the grill to enjoy while he continued brewing. From my experiences, I pretty well knew how long a big pot of water would keep temperatures if I insulated it.

I wanted a finished interior temperature of around 140 degrees F, around medium rare. My starting temp was 147, which dropped a bit when I put the meat in.


While I waited, I had a glass of wine, worked on laundry, chopped vegetables, looked at Facebook, etc.

Two hours later, when I pulled the bag out, the water bath had dropped to 137 degrees, perfectly acceptable to me. The exterior was a light gray, but with hints of bright pink showing through.

I made sure the rest of my meal (sauteed vegetables, garlic bread, and corn on the cob) was ready to go before I took the two or three minutes to finish up the steaks and and put them on the table.

I heated up my little Weber gas grill as hot as I had the patience to take it and then threw them on the racks to get those pretty grill marks and a bit of Maillard reaction for flavor. One minute for each side. The couple tablespoons of juices left in the bag went into the skillet that I had cooked the veggies in. A quick reduction, and then drizzled over the finished, plated steaks.

These chunky little steaks were tender, succulent, moist, perfectly done, flavorful and very evenly cooked.

I admit that I have a lot to think about now. All that I thought I had learned about cooking steaks and meat is requiring a re-thought.

You can see the pros here. Now let's look at the cons.

I think a big bone-in steak would be more problemaic. You do NOT want the bag to leak in the water bath, and a sharp bone tip might puncture a ziplock. Ziplocks are not necessarily food-safe with heat. Heat-sealed bags are not cheap, and you need a vacuum machine. Roasting bags, which are polyester, and more food-safe, are another option. It may require a bit of thought and experimentation to maintain a pot of water at the correct temperature.

The biggest one for me is the lack of sizzle and crisped fat at the edges. But some of that could possibly be handled with a hotter fire at the grill before finishing them up. Especially knowing that I have at LEAST a minute on each side, without changing the interior temperature.

If you want to look it up yourself, here is a place to start.

We shall see how the boneless pork chops in the fridge shall deal with Sous-vide in a couple days. Stay tuned!

Monday, January 26, 2015

Soup #6 - Sausage Vegetable

I coud have called this one, "Leftovers Soup." I literally pulled a bunch of random things I had in the fridge and made soup out of them. I didn't get a shot of this soup in the pot or in a bowl, so I thought I'd show you how I store it.

I love quart canning jars! You know exactly how much is in each one, the lid seals snugly, you can see what is in each one, they don't take up as much room as a bowl or pot, the glass holds no residual odors or stains. And they are pretty cheap! Each time I make a soup, it ends up filling most of two quart jars. One for tonight, one for leftovers.

I started with a half pound of hot and spicy turkey sausage. I fried it up, crumbled, and then added chicken broth, julienned sweet potatoes, some canned corn, sliced zucchini, and... I'm not sure I remember all of it. Maybe some pre-blanched green beans. When it was cooked and heated through, I sprinkled a few tablespoons of seasoned dry breadcrumbs (like Progresso, but store brand) to give it a little body. But the result was... delicious! And it was all because of the sausage! Just to eat highly seasoned sausage plain can be a little intense, or maybe not set well on the stomach. But using it in soup causes a wonderful rich, spicy flavor.

I wasn't expecting much out of this one, perhaps even tossing the leftovers. But we ended up eating all of it, it was so good!

Wednesday, January 14, 2015

Soup #5 - Cock-a-Leekie Soup

Ok, I'll admit it, I like to say the name of the soup even better than I like to eat it. It is Irish, I think. Cock meaning chicken, Leekie, meaning leeks. The first time I even really heard of leeks was when I got an international cookbook for a Christmas present and saw a recipe for it. I don't actually follow that old recipe, rather I do what I usually do, remember in general how it goes together and then start ad-libbing.

Leeks are like overgrown mutant green onions. They have fat, thick stalks with fleshy green leaves that have usually been trimmed before you get them. They are usually grown in silty soil, which gets all on them and in them, so they have to be washed very well. When you select them, remember that it is the thick white and light green stalk that gets used, so pass up the shorter ones with abundant green leaves in favor of the thick, heavy white stems.

Wash leeks by trimming off the dark green top and then slicing vertically down from the top to within a couple inches of the root end, and then turning the stalk a quarter turn and doing it again. Plunge in a bowl of water and swish vigorously, getting all the grits out.

Slice them across and then saute in butter. Don't brown them, just get them nice and soft. Chicken broth and a diced potatoe go in next. (It's Irish, remember?) I went ahead and threw in a diced sweet potato for the nutrition and visual interest. For a little extra, I added Swiss Chard about 10 minutes before I wanted it to be done. Then I began to fine tune the seasoning. A daub of Pesto, garlic powder, a squirt of lemon juice is all I think I added. Then I gently stirred my pre-cooked chicken in. It was already falling apart, and I wanted some chunks to remain. If I had sauteed raw chicken pieces at the beginning, they would already be in there, becoming tender and cooked. The last part was a generous splash of milk. Make sure the soup is hearty enough to not be thinned out too much by adding milk.

Be aware, Leeks are sweet! In fact, once you cook them, all onions become more or less sweet. That is one reason I like the bit of lemon juice with it. It seems to balance it all out.

This soup was mild and delicately seasoned, which means that my husband had to add pepper and hot chili oil, but I liked it with just a plop of greek yogurt dropped into my bowl.

Thursday, January 8, 2015

Soup #4 - French Onion Soup


I've made this recipe before, and it is the best French Onion Soup I have ever had. It comes from Cook's Illustrated. They have made an alternate cooking method that doesn't take as long, but if you want the best soup, the long-cooking original is the one to make.

I have a great little cast iron bean pot; it is one of the older made ones, smooth as glass inside, well-seasoned, and the perfect size. It takes about four pounds of onions (use the regular yellow ones or the white ones, not the "sweet varieties") sliced thin. They bake (with a pat of butter), covered, for an hour at 400 degrees. Then stir, tip the lid a little and bake for another hour and a half. They will be pretty caramelly looking by then. Put them on the stovetop and cook them on medium, stirring often. Every time they start getting crusty on the bottom, add a fourth cup of water to stir it up into the mixture. After about 3 or 4 times of this, you are supposed to add some sherry. I never have sherry, so I stir in about a half cup of dry white wine. After you cook the alcohol off, you add a quart of chicken broth, a pint of beef broth, and a pint of water. I didn't have fresh thyme like it called for, so I put in a couple pinches of dry thyme. And a bay leaf. Simmer for about 20 minutes or so and then it's done!

The way you are really supposed to serve it is to lay a chunk of bread on the soup, grate cheese on it, then stick the whole bowl under the broiler. I usually just put a piece of bread on a foil, slice some cheese on it, and then broil that. Then I plop the whole thing on top of the soup.

Cork is not fond of soggy bread (ok, so he hates soggy bread), so his is served to the side. His loss!

You just can't imagine how good onion soup can taste!