Sunday, October 21, 2012

Standing Computer Desk Upgrade!

I've been using my new ironing board standing keyboard station for my computer desk for a week or so now. And it has really worked out great! I can lay out the papers I need to refer to, set aside items I don't need in my way right now, it adjusts infinitely for perhaps a little sitting, perhaps a little video watching, the mouse glides well over it, and I can still iron clothes on it on Mondays! But the wart on the nose has been the pesky iron holder on the end. It would have been ok if my iron fit on it, but it is too narrow for my Rowenta. So every time I bumped it or it got in my way, it was not, "Oh that iron holder!" It was "Oh the annoying piece of useless %*#)^@!"

Then I got to thinking, if only it were a cup holder. A cup holder that was safe around computers for no tipping of cups. It took me about a week to come up with just the right "found object" to make it all work.

I dug out the lid to a bulk DVD case and tried it out. First I had to flex the metal flanges of the iron holder out a little bit. That allowed the DVD lid to wedge snugly in the gap. But since it was straight up and down, I didn't feel safe with a full glass in it; it might continue to slide on down. So I took two very short and fat wood screws and barely screwed them through the plastic just below the rims on opposite sides of the lid. These made nice little stops to make the holder secure, and since it is wedged, it doesn't swing. There is no way my cup can tip over since it is deep in the holder. 


Voila!

Wednesday, October 17, 2012

Bew Day, Pt. 3

So now I have this big pot of boiling liquid that I need to cool down, and for the best beer, it needs to cool down fast. But what I can't do is mess with it because that will introduce bacteria and wild yeasts. In the length of time it will take to cool down to pitch MY yeast, the other beasties might have already taken control. What I really need is a wort chiller.


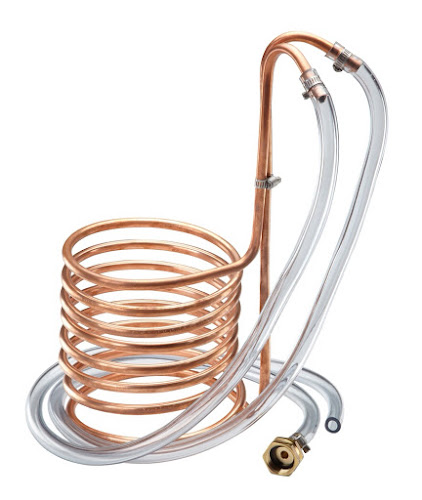
This handy device is set into the boiling wort to sanitize it, and then you take the pot off the stove and set it in the sink or outside and hook up one end to a garden hose of cold water. The other hose runs somewhere that you might appreciate having some nice hot water, like a hot tub. Alas, maybe next time. This time, I had to use the "make-do" approach.


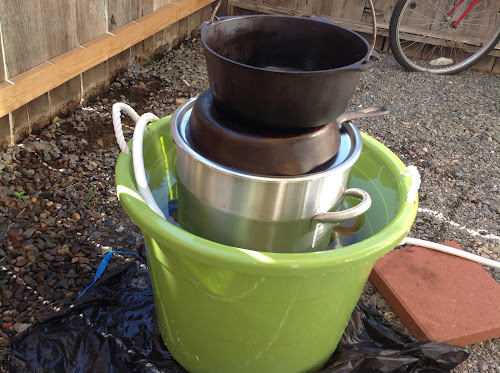
I had to stack some of my cast iron on top to keep the pot from floating, since the liquid did not come up higher than the water. I ran cold water through the bath for an hour, making a little river on the other side of the fence and down the asphalt to the drain. I tested it a couple times, and FINALLY it came down enough to finish this part. By now everything that came close enough to barely kiss the wort had to be sanitized, so I was spritzing everything in the vicinity.

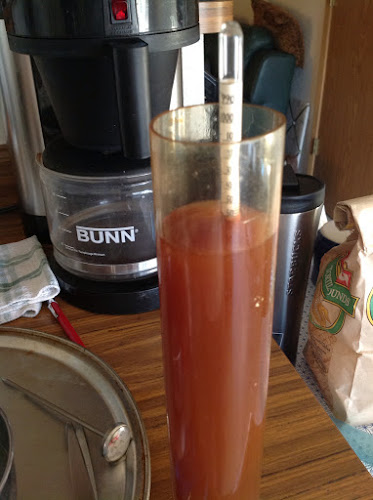
After I poured the wort into the fermentation bucket, I added more filtered water to bring it up to the 5 gallon mark. I took a sample out to test for the specific gravity.


This basically tells you how much dissolved sugars there are in the water, which reveals the potential alcohol level. You take a sample after the fermentation, subtract the difference, and then you can have an idea of the actual alcohol level.

My sample showed the same reading that my instructions said it should, so I know I didn't forget to add anything!


By the next morning the vodka in the airlock was bubbling away, sort of like your kid breathing. And just like a new mom, I found myself checking the nursery, err, closet to see if it was still breathing.

I'll be checking back in for the next step, transferring to the secondary fermenter!

Tuesday, October 16, 2012

Brew Day, pt 2

My potion had steeped for a half hour in the hot water; now it was time to crank it up. The barley tea had to come to a full rolling boil. Gas gives you the most control; I wouldn't have done this with an electric stove top. A turkey fryer would have been excellent to get it on up there, but the gas stove top was ok. In the meantime, I wanted to warm up the Liquid Malt Extract, from henceforth known as LME. (Brewing is full of abbreviations, and if you don't want to look like a total novice, you nod and smile when they talk in alphabet-ese)


I knew from the demonstration a few days ago that this stuff is thick and sticky. Really, it's worse than honey for being hard to rake out of the plastic can. So I did the recommended thing; I set the can into a pan of hot water. (I didn't actually heat the water on the stove with the can in it though!) While the mixture cooked, I replenished the hot water periodically.


Into the rolling boil, my helper gradually poured the Dry Malt Extract, henceforth known as DME, while I stirred. DME is a lot like Carnation Malted Milk, but sweeter and stickier.

Next came something known as the "hot break." They talked a lot about this, and it was confusing until I realized what they were talking about. You know when you are boiling noodles, or making cream of wheat, or boiling up some other mixture of water and carbohydrates, and then it is boiling, and if you turn around for an instant to get a spoon or answer the phone you hear SSSSSSSXXXXXS! as it boils out of the pan all over your stove top? You know that you just have to get it past that point by stirring, turning down the heat or spritzing cold water over the foam, and then the danger is past; it safely boils along until it's done. Well that's what is happening here. A chemical change happens to the bonds that keeps it from that boil-over danger after that, or at least until you add new ingredients.


So I passed through the fire with my hot break with no boil-overs or other dangers.


I never let the directions get very far from my hot little hands.


There were three kinds of hops to be added, for bittering, flavoring, and aroma. The first two were added in the middle of the hour-long boil.


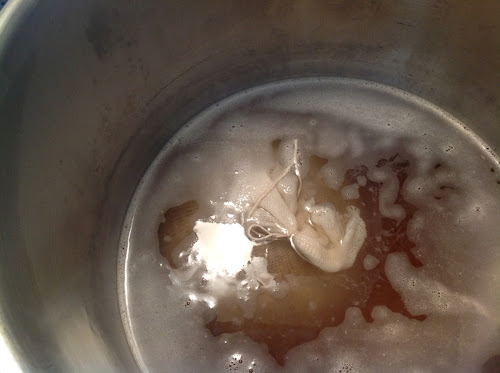
These hops were added at the end in a steeping bag.


Near the end of the boil, the LME was added. (Actually, it wasn't added in a passive manner; I added it myself!)

At this point I needed to cool the wort (rhymes with "dirt," not "wart.") and cool it quickly. The best device would be a copper coiled wort chiller, but I didn't have one, so I did the next best thing. Stay tuned!

Saturday, October 13, 2012

Brew Day, Pt. 1


It wasn't to save money; no, I'd be lucky if it didn't cost MORE money. It wasn't to make something better than I could buy; I'm not sure if I could even come up with something as good as I could buy. But tell me, why does any crafter, garment sewer, baker, artist, musician, have to make THEIR OWN? I don't know why, but I know it's true. And I wanted to Brew My Own.

I yo yo between liking wine and microbrew beers the best. But I think that a good ale probably comes out on top. I have thought how fun and satisfying it would be to craft my own someday, and the day finally came. The week we moved, I found the information for the local home-brew club, portentously called the SOBs. There is another "S" in front of it that stands for Shasta, but I forget what the SOB part really stands for right now. It's probably the fumes of the yeast bubbling out of the cute little airlock on the fermenter.

I'm really not much for mixes. I made a cake from scratch by myself when I was in probably the 5th grade. I didn't know it was from scratch; I thought making a cake from scratch meant you weren't allowed to use a recipe. When I get complemented on a baked item that was from a mix, I find myself babbling apologies, that it was just from a mix, and anyone could do it, etc. and ad nauseum, though I'm getting better at just saying "Thank you." But beer making was foreign to my skill set, and I REALLY wanted my first batch to turn out well. So I bought a kit.

The kit was put together by the local home-brew shop, and was a Sierra Nevada Pale Ale clone. I went into the store with all the brew stuff I had, and the owner went through it, pulling items off the wall that I needed to complete my set-up. The one item I looked longingly at on the shelf was a wort cooler, a bootlegger-ish looking copper coil set-up that would quick-cool the wort, buy immersing it into the hot wort and running cold water through the copper pipe. But alas, that wasn't for today. It was my intention to make one myself for the next batch. One thing that was great about this local-made kit is that the hops and the yeast for it were kept in the 'fridge for freshness. And he ground the malted barley for it right then and there.

The next day was Brew Day.

I assembled the ingredients and read through the instructions. I cleaned everything again.


One of the best things you can do for your brew is use good water. It's no wonder that's what the major brewing companies brag about the most. It shouldn't have too many of the wrong minerals. It shouldn't have NO minerals, like distilled. And it definitely should not contain chlorine, which is what our tap water contains. I have been using a PUR pitcher system for my drinking water. It takes out all traces of the chlorine, and it tastes very nice. I could have went out and bought some bottled water, but I wasn't sure if it would taste as good as this. So I just decided to filter what I needed, which became tedious, I'll admit.


Next time, I'll taste test the purified water from the machine at the grocery store and probably get that.
I put the large stainless steel brew kettle with 2 gallons of hard won water on the range to heat up. (Thank you, Mike, for having good taste in brew kettles!) I had to take the temperature up to 157, drop in the bag of cracked roasted barley, and keep the temperature as close to 154 as I could for 30 minutes. There I found myself lacking a tool that would have made that easier--a long cooking thermometer that clips to the side of the kettle. The best one I had was a short instant read device, which I kept sticking into the water to make sure it wasn't heating up too much. One benefit was that I got to keep sniffing at the aromatic barley tea I was making. Yum!


Apparently, this part of the barley stuff was only for color and mouthfeel. The serious business was the barley malt extract. That's what would feed the yeast and create the beer.

Stay tuned for Part 2!

Friday, October 12, 2012

For a Standing Computer Station


I was going crazy trying to think of a thrifty way to have a lecturn-ish thingy to put my keyboard and mouse on to use in front of my computer. I had already put the computer monitor up on a monitor stand, which put it at just the right level.  For awhile I used my Peak folding music stand, but it wasn't sturdy enough in the horizontal position to work well.  Finally, I thought of this. I only use my ironing board once a week, and there it was, just lounging around, sitting in my closet the other 6 days of the week! Lazy thing, I'll put you to work!

It's great! Nice and long, for arranging pieces of work. It adjusts up and down nicely. The padded fabric surface is perfect for mousing. I like my keyboard tilted away from me, making it more ergonomic. I happen to have a longish,  thick gauge glass (if you look right under the monitor, you'll see it resting there) that I just prop under the front edge of the wireless keyboard, which puts it at the right angle to keep my wrists straight.

The only thing is the stupid iron rest attached to the end of the ironing board. I was happy to get it, that is, until I got it home and realized that it wasn't meant for a nice wide Rowenta iron. Oh well, I'm sure I'll think of a good use for it, maybe make it into a cup holder.


Wednesday, October 10, 2012

A Brand New Adventurous Project!


Guess what I'm going to do????

Tuesday, October 9, 2012

New Things

There are a lot of new service providers to choose once you move to a new town, a new area. You have to find a new doctor, a new auto mechanic, a new dentist and optometrist. Most of it is pretty tedious. But I always enjoy trying out all my available options in my quest for a new...

Grocery Store! Yes, the most important shopping experience of my daily life. I spend more time there than any other shopping location, at least once a week, and what I get impacts every day of cooking and eating. Back in my previous town, I had settled on Winco. Winco was great for low prices and good selection. Sometimes the produce seemed, well, one-day-oldish, and the meat selection, while extremely affordable, was not that great. There was a lack of anything organic, and I didn't buy ice cream there. It seemed a little re-frozen sometimes. So I made up for the lack by shopping for other things at Raley's, BelAir, New Earth Market, filling in the gaps. Sometimes that made for a tiring shopping experience!

Now that I was only going to be cooking for two, I could afford to not pick a store based primarily on price, though that would be a consideration. Freshness, good price, an expanded meat market, cleanness, convenient location, some organics, variety in produce-- those were on my list.

All roads lead to Walmart. It seems to be the first place you visit when you are setting up house. Our Walmart is a humungous, brand new facility. I was more than a little annoyed though that the floor plan was not the same as all the rest. It was different, and I wandered around for a long time, getting my bearings. Walmart is not bad to pick up a few things, but I couldn't make it MY grocery store. It is crowded, both the parking lot and the store, at all hours, and the checkers are few. The groceries are ok, but when you carry everything, you can't carry a lot of it, even if the store is the size of all of Lemoncove.

I did try the local Raley's. It is obviously a smaller, older store. It is not bad, but seems more like a neighborhood market, not one to drive across town for.

I also went to the local Winco. It is across the boulevard from Walmart. It is also humungous, and it is also very crowded. I did not feel the magic.

Then I visited the newer, close-to-me Safeway store. What a nice place! The butcher was very helpful, and they carry all sorts of meats. The produce aisle is an exciting place to mill around in. There is a Starbucks inside, and also a Starbucks at the other end of the parking lot. A CVS is right next door, and on the other side is a Lowes. So I'm done looking, and that's a good feeling!

Still to ponder is the Costco option, now that I live in a town that actually has one close by.