Wednesday, August 31, 2016

MOG - "Wrapping up Great Grilled Chicken: Chicken Souvlaki"

I remembered about halfway through making this chicken recipe that some time back I had decided not to make kebabs any more, and why. I am sure there are reasons why one would go through the process of cutting up pieces of food, thread them onto metal spears, flip them around trying to cook them evenly, and then just slide them off onto a plate to eat them, when one could throw big chunks right on on the grill and then cut them up on the plate. Perhaps you are camping and there is no grill handy, so the food goes on a stick, or perhaps you are camping and forgot the plates and have to eat the food directly off the stick. Anyway, this recipe looked good, and fairly quick and easy, and I forgot what I decided about not doing kebabs.

The problem with the effort these took mostly lay in the fact I had determined to follow the recipe in the book. If I had been making this up as I went, I would have decided to go Greek, and said, "Tzatziki sauce, ok, a bunch of Greek yogurt, some lemon juice and garlic and salt to taste, and then stir in some cukes. Hmm, let's see, what sounds Greek for a marinade? Olive oil, lemon juice, and let's see what green herbs sound good. Guess I better light the coals!" Instead I was jumping around all over the page following the specific instructions for each part of this recipe. Plus going back to the the "why this recipe works" intro for those specific little bits that aren't tucked into the recipe itself.

I had never brined anything before, and this looked like an easy way to check it out. It called for boneless skinless breasts, which I wouldn't have used because they would likely have gotten dry and maybe overcooked on the grill.

After they had almost been in the required 30 minutes, I saw that they were supposed to already be cut up in 1" chunks. So I did that and threw them back in the brine for a while longer. Meanwhile, I made up the oily marinade.

It called for minced parsley. I went ahead and got Italian flat parsley since I already knew I didn't much care for the regular stuff. Turns out I don't care for this either. The odor is sort of strong and medicinal, and bitter. Just like the other parsley, only a little more tender. So I measured out and put in the small amount it called for, even though I had a big bunch that was going in the trash after this.

Mixing up the sauces, re-checking which ingredients went into which one, handling the raw chicken like toxic waste to keep from contaminating anything with germs, and my kitchen was getting pretty messy. Plus my lemon kept squirting juice from the squeezer on the pages of my cookbook. I had to wipe it down with a damp rag so that when I closed the book they wouldn't stick together. So now I'll always be able to find this page, since it's wrinkly and curled.

One thing I retained from my previous kebab days was the habit of putting the different things on different skewers. I like the better control of the cooking process. Even if the book says to do it the other way.

Onto the hot coals! Instead of piling them on one side, I left the hot spot in the middle and moved the sticks off to the side when they needed slower heat. I used an instant read thermometer to make sure I didn't cook them a minute longer than necessary.

Aren't these skewers the cutest? Plus, they are flat so the food doesn't twirl around when you turn them over.

My sister gave them to me, and each one is different.

I had more chicken than I needed for the recipe, so I did a second batch slathered with leftover home made pesto.

The pita bread is wrapped in foil. I followed the instructions to sprinkle a bit of water between two of the four breads to soften them as they steam. Grocery store pita can be sort of inflexible and dry.

I made the dressing following the recipe, except I couldn't bring myself to use chopped mint. I like mint in mojitos and tea. Not food. I pinched in a little oregano to make up for the omission.

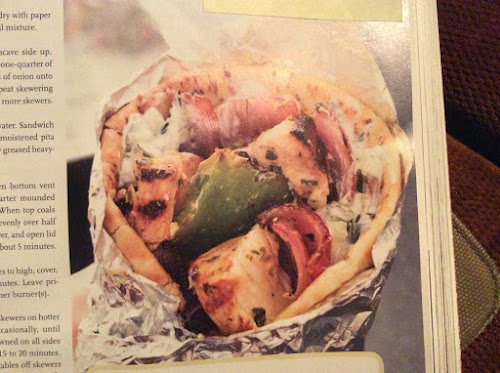
In the end, they were very delicious. The chicken was moist and tender, and the seasonings all complemented each other. And I used little foil squares like the illustration to keep the Tzatziki off my hands.

See? Looks just like the picture! (Except I used yellow onions instead of red. Always changing something!

Saturday, August 27, 2016

MOG - Glazed Salmon

My aim is to have fish on Fridays. Fish is supposed to be good for you, especially salmon, and we have a great meat market, so I like to try to do that. This little recipe seemed worth a try. Fish wants to fall apart on a grill, so the method the book comes up with makes me want to try it.

You make little foil pans for each piece of the fillet to ride in as it sizzles and makes grill marks through the foil.

I went to R&R Meat and Seafood Market and got a nice fillet of fresh coho salmon. The directions said to pull out the pin bones, which I usually do anyway, and to skin it. It was not as easy to cut the fillet off the skin as I'd thought it would be, especially since I was trying not to abandon even a sliver of $10 a pound salmon on the discarded skin.

The thin edges, I just left the meat on the skin and planned on cooking them on a foil, as is.

The sauce, I found intriguing. I called for 1/2 c jalapeño jelly, 1/2 c packed cilantro, 2 scallions ( I used a shallot, since that is what I had) 2 garlic cloves, 1 t grated lime zest, 2 T lime juice, and 2 T butter. You blenderize everything except the butter, heat it to barely a simmer, take out a quarter cup of sauce and set aside, then stir in the butter to the rest of the sauce. The small amount of sauce gets spread over the fillets as you lay them in their little foil boats.

The grill gets a pile of hot coals in the middle.

The boats get laid. On top of the coals, of course!

They cook and sizzle smartly for about five minutes, supposedly getting crispy and brown on the bottom. Then you are supposed to turn them over with tongs, coat them with half the rest of the sauce and move the boats to the cooler edges to finish cooking.

It didn't go as smoothly as I'd wish. Fish is so delicate and quick-cooking. Because of the sugar in the glaze (from the jelly) it did want to blacken a bit, so when you saw the burned edges under the fish, you wanted to check the underside. But then you saw it wasn't crispy yet, just steamed looking. And the coals were really hot for hanging over it with tongs. So I moved them around and messed with them until I was as satisfied as I thought I could be.

So I pulled them off the grill and served them with a mushroom and homemade pesto linguini my son fixed up for me.

They were ok. I wasn't prepared for how sweet they would be. We all agreed that the cilantro came through loud and clear. They were nice and we ate them all up. But my personal opinion was that they were too sweet for my taste, the flavors in the sauce were too busy arguing with each other to meld and get along on the palate. And the fuss of making them on the grill was much more than the reward was. I think I'll try one more salmon recipe I see in this book, and then I'll probably go back to just cooking my salmon fillets in the oven.


Friday, August 26, 2016

MOG - Alabama Barbecued Chicken

"Introducing White Barbeque sauce."

Well, that sounded intriguing. And I had one chicken left from the twin pack I had bought the day before. I liked the idea of the smoke too, so I bit.

Page 242 in Masters of the Grill, from America's Test Kitchen.

There were a few new things to do in this recipe. One was to halve the chicken. I have butterflied one before, but not cut it completely in half. It was a cinch. I went ahead and removed the keel bone along with the backbone.

I went ahead and made up the "White Barbecue Sauce."

Guess what, it is basically creamy salad dressing. I love mayonnaise and could eat it out of the jar with a spoon, but I'm iffy on creamy salad dressings. 3/4 c. Mayo, 2 T cider vinegar, 2 t sugar, 1/2 t horseradish, salt, pepper, and cayenne (again, I used chipotle powder). Blenderize it and stick it in the fridge while you get everything else ready.

Now here's a thing I hadn't really done before (well, maybe once years ago, but I don't remember it well). You make a smoking packet. Soaked chips get folded up in foil and and then you poke a couple slits in the top only, not the bottom. When your coals are ready, you drop it on top of one side of the briquette piles.

For the chicken, you rub the halves over with a small mixture of spices. Salt, pepper, cayenne (chipotle). Now the idea is that the chicken, having more exposed meat by being split in half, will absorb more seasoning and smoke.

Here's where we use that "disposable foil pan" otherwise known as a piece of heavy duty foil with the sides turned up under the chicken, in the "cool" area. Put the chicken skin side down and cook until you get about 120 degrees at the thigh, about a half hour.

Uh Oh. I was supposed to open the bottom vents half way. The view from the top was all covered with foil and flames. The bottom was pretty hard to make out, with all the stuff in the way. I need to get a sharpie and make a mark where half way is, since I am sure I will forget to check it in the future also.

The recipe actually called for two chickens, but I just used the one I had. So now I have sauce ( otherwise known as "creamy salad dressing") left over.

So you are wondering, where does the sauce come in? That's where we have a glitch in the recipe, I believe. The actual directions don't even mention it until the very end, where you "brush chicken with remaining sauce, carve, and serve." You have to read back to the intro to the recipe where it says they "coated the chicken with (the sauce). The chickens were basted in this sauce two times during cooking..." I wasn't sure. Was I supposed to coat the chicken before I even put it on the grill? Well, I didn't because at first I was following the recipe directions.


So now I'm gettin' some sauce on. I flipped the chicken halves and slathered them. The sauce is kind of melty and boily on the surface. For the first half hour the smoke steadily poured out of the foil pack, and now it seems about petered out. I used mesquite chips. I am most fond of hickory, but I feel that is pretty strong for chicken, and prefer mesquite over hickory here.

I didn't care for the look of the sauce on top of that once crispy skin, so I briefly laid them over directly on the coals to get a quick sear.

I slathered again and kept them skin side up, still on indirect heat until the instant read thermometer read 175 at the thigh, about another 15 minutes. Seemed a shame to waste the coals, so I split some Chinese eggplant, oiled and seasoned them, and cooked them up on the hot briquettes.


Don't they look incredible?

And they were the most delicious little poultry pieces I think I've ever had. Juicy, smoky, savory.

I think that I won't worry too much about what sort of white creaminess I use next time; some mayo, some vinegar, salt, pepper, etc, but the way I cooked them was really a success. And next time I'll slather it on before I even put them on the grill and see what that does.

I will definitely put a star on this page!

Wednesday, August 24, 2016

MOG - Bone-in Chicken Parts, and Butternut Squash

I had the wild idea that I would plod through the book, doing each item in turn, sort of like Julie and Julia, as she works her way through Julia Child's French cookbook. But, nah! I'll be picking and choosing. Today it was chicken, even though chicken is 66 pages into the book. I've done chicken parts on the grill before but I'm always hoping for new tricks.

First, the Butternut Squash. I like it and am always looking for new and nice ways to eat it. You takes your squish, and you cleans it out and then you peels it with a knife (or fat vegetable peeler). Make sure you get all that whitish fibrous layer under the rind. Slice into half inch thick slices and simmer for about 4 or 5 minutes, until tender but firmish. The cooking on the grill is just to heat them and give them a nice finish. Dip them out of the water and drain, then drizzle/toss some oil on them, and sprinkle some salt and herbs and stuff on them. Then you can just set them aside until you're ready to cook them.

Now, back to the chicken.

I do enjoy cutting up chicken! A nice sharp knife and the knowledge of exactly where to cut makes me feel clever. I made all my kids learn too, so the wouldn't be at the mercy of the precut parts in the grocery store with all their little bone pieces and odd sizes.

Now here is a true side-note. There was a recipe for making portabella burgers, so I thought, all that grill space, why not kill THREE birds with one stone? So I bought one mushroom and prepared it. It said to scrape the gills out for better flavor. I'd never done that before. It did make it look more attractive.

Now back to the chicken.

I made up one of the suggested dry rub recipes, Tex-Mex Spice rub. It makes more than you need, so I get to use it again. 1/4 cup ground cumin (I lightly toast and grind my own cumin seeds), 2T chili powder (I use the mild Pasilla from the packets in the Mexican food aisle), 2T ground coriander (see cumin), 2T dried oregano (I was short so I used half thyme), 2T garlic powder (I always use granulated), 4t kosher salt (I used around 3), 2t unsweeetened cocoa powder (I guess because of the mole sauce connection), 1t cayenne (I substituted 2t of chipotle chili powder, to get some flavor with the heat).

As you gaze upon this pile of seasoned chicken parts, I beg you to notice the white paper underneath. OMG! Why didn't I think this up before? It is Reynolds freezer paper, the same stuff you get your cuts wrapped in from the butcher. It is tough, plasticized on one side, super wide and comes in a big honking roll, pretty cheap at Winco. I used to use paper plates or waxed paper when I didn't want to have to wash a cutting board or a countertop or baking sheet after dealing with raw meat, oils, or seasonings. And when you get your foods ready, you can wrap them up in it and stick it in the fridge to await your fire. (I'm thinking of getting my kids a roll of it for Christmas)

So apparently, putting a foil pan between the piles of coals helps even out the temp and lower it a bit. (Along with catching the greasy drippings) I didn't want to trash my last foil pan, so I just made one out of heavy duty aluminum foil.

Waiting on the coals seemed like a good time to tap the latest brewski. A mild little saison I made a few weeks ago to get back in the groove. Cheers!

It's interesting how the directions called for me to cook them exactly opposite of my previous way. I used to brown the pieces over a center pile of coals and then set them off to the side to finish cooking. Here, you arrange them in the cooler middle, and then after a set amount of time, you move them over on top of the coals to brown. One advantage to this way is that there were much less flare-ups. Some of the first fat rendered off onto the foil at the beginning so I didn't have to deal with it during the browning.

Once the chicken registered done according to the instant read thermometer, I moved it to the middle and cooked the rest of the food. (The foil packet is a hunk of sourdough) One problem I had was the the coals were already too cool to do the squash like I wanted. I stirred them up, which gave me a little blast of heat that helped. I guess I might have used more coals. Even though it feels wasteful, it is ALWAYS better to have a few too many than too few!

I cut the mushroom up with a pizza cutter into wedges for a side. I liked it without the gills. Less "wet" and gross-looking, and good flavor.

Dinner is served!

Everyone pronounced it very good.

Monday, August 22, 2016

MOG - Burgers for Everyone, pg 6

I was surprised to see that the first item in the book, Great Backyard Burgers, call for an internal temperature of only 120 degrees for medium rare! I just don't trust rare hamburger that much, and I thought it was universal by now. But the instructions for the burgers on the next page are led by "These days, many backyard cooks prefer grilling burgers to medium-well and beyond." Yup! This recipe is for me! But the problem is, as they explain, that when you cook them through, they can end up dry and tough. The rescue is a "panade," a mixture of starch and liquid. You will recognize one form of that as ingredients in meatloaf. But I didn't think about the science of the thing. "Starches from the bread absorb the liquid from the mild to form a gel that coats and lubricates the protein molecules in the meat...keeping them moist and preventing them from linking together and shrinking in to a tough matrix."

The other suggestion I followed in this recipe was to use 80 (lean) 20 (fat) ground beef, rather than the 85/15 I usually buy. It's America's Test Kitchen, after all, and they said it won the taste tests!


I doubled the recipe. After all, who goes to the trouble of a charcoal grill for 4 burgers?

A couple pieces of white bread, crusts removed, mashed in a bowl with a quarter cup milk. About a tablespoon and a half of steak sauce - Whoops! no steak sauce in the fridge, so I used a couple teaspoons Worchestershire sauce and a couple teaspoons sweet barbeque sauce. Add in a couple of minced garlic cloves, a teaspoon or so of black pepper, and a teaspoon of salt. ( I always reduce the salt in these kinds of recipes by about a third, which seems to work best for my tastes.)


Then you sort of fluff the meat in to the mix. Sort of mixing, but not heavy-handed. Finally, to do it right I had to abandon the fork and do it the old fashioned way, with my fingers.


Then, as the directions say, you lightly toss each portion from hand to hand, into a ball, then gently flatten. Sort of fun. My husband was amused, and it made a satisfying plopping sound. The last thing to be done was to press a dimple in the middle.

The dimple works. I've noticed this from before. If you don't make a dimple, the burger puffs up like a flying saucer in the middle. Because the bottom and sides are both cooking at once, the sides compress the middle like a belt, squishing the burger up towards the path of least resistance, the top.

Meanwhile... The grill. Because my fancy new Weber has a gas canister starter for the coals, I didn't need a chimney, just dumped them in and sparked the gas. The pile of coals, when ready, went onto one side of the grill, for maximum heat.


There was lots of flamin' and searin' going on, and I was careful to keep an eye out for total conflagration, but it seemed to be ok. Once both sides were quite dark and crusty, I did move them over off the briquettes to finish cooking a bit. I plated them when the instant read thermometer read 140-145, as per directions, even though I saw some pinkness. (Slide it in sort of top and sideways to get maximum temperature reading exposure)


A few seasoned zucchini slices went on with the last batch.


By the time we were ready to eat, all the pink had disappeared and the juices weren't boiling anymore. The burgers were dark and crusty, and tender and moist. They were also quite thick. Although I had some trouble keeping some of the burgers together when I turned and moved them around on the grill, now they were sticking together well enough.

They were seasoned just right. At first it seemed like I should really have gone to town with the spices during the mixing, but I realized this was a better way, to let the flavor of the beef, the char, and the condiments shine. And I'd have to say, some of the best burgers I've had!

MOG - "Masters of the Grill" series

Not long ago I got a fantastic new Barbeque, a deluxe Weber on its own stand. I ran across this book at Barnes and Noble, and I was perusing it, a friend who had also just bought an identical grill to mine, walked up to say hi. Under his arm were a couple of grilling manuals he was considering. I knew it was a sign for me to take my barbecuing up to the next level.

I bought the book and decided to go through it, as thoroughly as reasonable, and blog about my results. Therefore, let the MOG begin!